Showing posts with label UNIX. Show all posts

Sunday, 24 March 2013

lsof - List open files


This lists information about files opened by processes. It is great, especially when you are troubleshooting an issue and need more information about process or connection details. Linux treats most everything as a file. An open file may be a regular file, a directory, a block special file, a character special file, an executing text reference, a library, a stream or a network file (Internet socket, NFS file or UNIX domain socket.) A specific file or all the files in a file system may be selected by path. When a process or application interacts with these files it has to "open" them. Using this command you can dig into and see what your process is doing.
To show all the open TCP files - This will give you what service is running, who is running it, the process ID and the connections on all TCP ports:

# lsof -i TCP

Show open files or programs that is running on TCP port 80
# lsof -i TCP:80
COMMAND PID USER FD TYPE DEVICE SIZE NODE NAME
httpd 21867 root 3u IPv4 98670393 TCP *:http (LISTEN)
httpd 21891 apache 3u IPv4 98670393 TCP *:http (LISTEN)
httpd 21892 apache 3u IPv4 98670393 TCP *:http (LISTEN)
httpd 21893 apache 3u IPv4 98670393 TCP *:http (LISTEN)
httpd 21894 apache 3u IPv4 98670393 TCP *:http (LISTEN)
httpd 21895 apache 3u IPv4 98670393 TCP *:http (LISTEN)
httpd 21896 apache 3u IPv4 98670393 TCP *:http (LISTEN)

To list which user is actively using /tmp/
# lsof /tmp/ COMMAND PID USER FD TYPE DEVICE SIZE NODE NAME
bash 4756 root cwd DIR 8,2 36864 212577 /tmp/

Project site : http://freshmeat.net/projects/lsof/

Friday, 22 March 2013

PuTTY: Extreme Makeover Using PuTTY Connection Manager

PuTTY Connection Manager was mentioned in the 12 PuTTY add-ons that we discussed a while back. One of the major missing features in PuTTY is the ability to display multiple sessions in Tabs.

PuTTY CM displays multiple PuTTY sessions in Tabs. In this article, let us review in detail the 5 powerful features of the PuTTY Connection Manager that will make PuTTY more enjoyable.

Download PuttyCM:
Download the PuTTY Connection Manager. PuTTY CM is written in C#. You need .NET 2.0. When you install PuTTY CM for the first time, you need to specify the location of the PuTTY executable.

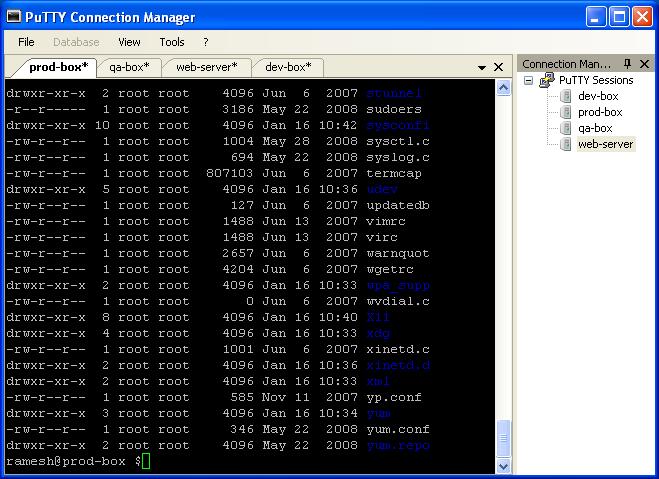
Feature 1: Display Multiple PuTTY Sessions in Tab

If the PuTTY Connection Manager opens the original PuTTY in a separate window, instead of opening as a TAB, please go to Tools -> Options -> Select the check-box “Enable additional timing for PuTTY capture (ms)” -> set the value to 500 ms. This will open the PuTTY window inside the TAB as shown below.

Tabs for PuTTY
Fig: PuTTY sessions in Tabs

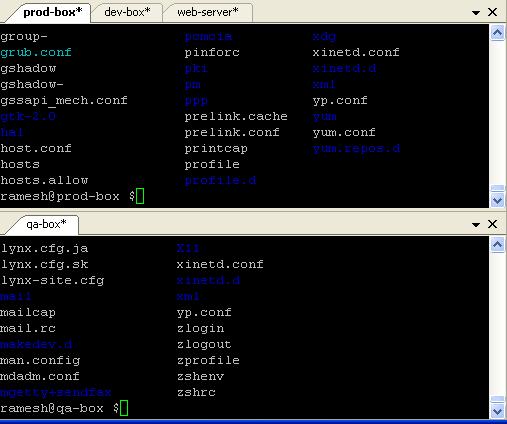
Feature 2: Dockable Windows for PuTTY Sessions

Apart from displaying multiple PuTTY sessions in Tabs, PuTTY CM can also show different PuTTY sessions in panels.

In the example below, to move the qa-box PuTTY session to the bottom panel, left-click on the qa-box tab and hold the mouse until it displays the panel symbol (which will be like a Plus symbol) in the middle of the screen. Now move the mouse to the bottom of the plus, which will high-light the bottom portion of the screen indicating that the qa-box session will be moved to the bottom panel.

PuTTY Dockable Windows

Fig: Select the Panel to dock a PuTTY session

Now, release the mouse, which will move the qa-box to the bottom panel as shown below.
Multiple PuTTY Sessions in Panels
Fig: Selected PuTTY session docked in proper panel

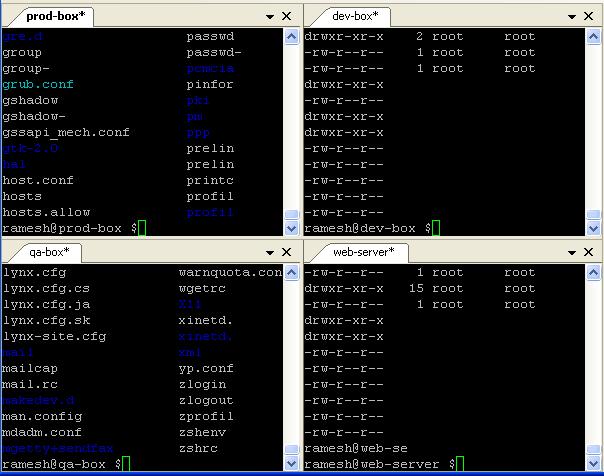
Using the similar technique you can move all the PuTTY sessions to different panels as shown below.
PuTTY Sessions in four panels
Fig: Multiple PuTTY Sessions docked appropriately

Feature 3: Encrypted PuTTY Configuration Database

By default, PuTTY session informations are stored in the windows registry, which are not encrypted. If you want to keep the session information (ip-address, session name etc.,) encrypted, you can use the database encryption feature available in the PuTTY CM

  • Download the AES encryption library (pcmcrypt.dll) from PuTTY CM website.
  • Place this file in the PuTTY CM program folder. C:\Program Files\PuTTY Connection Manager
  • Restart the PuTTY CM
  • Go to Tools menu -> Options -> Database -> under the Encryption section, the available algorithms should display “AES Rinjdael Managed” as shown below, indicating that the encryption library is successfully installed.
Enable PuTTY Encryption
Fig: Enable Encryption

Click on File -> New -> Database and enter the appropriate information as shown below to create a secure PuTTY session database. Follow the best practices to create a strong password while choosing the passphrase for the secure database.

  • Database Name: putty-secure-sessions
  • Click on Enable database encryption check-box
  • Select “AES Rinjdael Managed 256 bits”
  • Enter a strong passphrase for the database.
  • Click on ‘Create database’ to create the database as shown below.
Create Encrypted PuTTY Database
Fig: Create Encrypted PuTTY session database

  • Click on File menu -> save database to save the database to a physical file.
  • Now the ‘putty-secure-sessions’ database will be displayed under the Connection manager as shown below
PuTTY Connection Manager Displaying Encrypted Database
Fig: PuTTY Connection Manager displaying Encrypted Session database

  • Right mouse-click on the ‘putty-secure-sessions’ database name -> Click on New -> Click on Connection, to create a new secure PuTTY session.

Feature 4: Automatic PuTTY Session Login

Once you’ve created a secure PuTTY session as mentioned above, you can setup automatic login. i.e you can save the uid/pwd for the individual PuTTY session in the secure database. i.e When you double-click on a particular secure PuTTY session, it will login automatically.

From the putty-secure-sessions database, select a particular PuTTY session, right mouse-click and select Configuration, click on the ‘Enable Macro’ check-box as shown below.
Automatic Login for PuTTY Session
Fig: Enable Login Macro For a PuTTY Session

From the same PuTTY session configuration window, click on the ‘Login Macro’ from the left-side menu and enter the uid/pwd as shown below.
PuTTY Automatic Connection Credentials
Fig: Automatic Login Setup for a PuTTY Session

Now, when you double-click on that particular PuTTY session, it will do the login automatically using the credentials you’ve provided.

Feature 5: PuTTY Session Post-Login Commands

You can also setup post-login command, which will get executed automatically after you login.

The setup of post-login commands is done under the same ‘Login macro’ screen under the ‘Post-login command’ section. Click on ‘Enable post-login commands’ check-box and you can set a total of 5 post login commands as shown below.

PuTTY Session - Execute commands after login
Fig: Execute Commands automatically after login


Tuesday, 19 March 2013

Show the line number while monitoring the log files using tail -f command?

Question:


How to show the line number while monitoring the log files using tail -f command?

Answer:


You can combine the tail -f command using either cat or awk commands:

Method 1:

# tail -f syslog|cat -n


Method 2: 

# tail -f syslog|awk '{print NR,$0}'


You should get the similar output as below:

 1 Mar 4 15:21:07 oraserver local1:info Oracle Audit[1433636]: LENGTH: "357" SESSIONID:[8] "75222038" ENTRYID:[1] "1" STATEMENT:[1] "1" USERID:[4] "APPS" USERHOST:[20] "oraserver.unix.com" TERMINAL:[7] "unknown" ACTION:[3] "100" RETURNCODE:[1] "0" COMMENT$TEXT:[99] "Authenticated by: DATABASE; Client address: (ADDRESS=(PROTOCOL=tcp)(HOST=69.9.172.201)(PORT=40167))" OS$USERID:[7] "apmgr09" DBID:[9] "711595639" PRIV$USED:[1] "5"
2 Mar 4 15:21:07 oraserver local1:info Oracle Audit[4198698]: LENGTH: "357" SESSIONID:[8] "75222037" ENTRYID:[1] "1" STATEMENT:[1] "1" USERID:[4] "APPS" USERHOST:[20] "oraserver.unix.com" TERMINAL:[7] "unknown" ACTION:[3] "100" RETURNCODE:[1] "0" COMMENT$TEXT:[99] "Authenticated by: DATABASE; Client address: (ADDRESS=(PROTOCOL=tcp)(HOST=69.9.172.201)(PORT=40168))" OS$USERID:[7] "apmgr09" DBID:[9] "711595639" PRIV$USED:[1] "5"
3 Mar 4 15:21:07 oraserver local1:info Oracle Audit[5456076]: LENGTH: "203" SESSIONID:[8] "75222036" ENTRYID:[1] "1" ACTION:[3] "101" RETURNCODE:[1] "0" LOGOFF$PREAD:[1] "0" LOGOFF$LREAD:[2] "39" LOGOFF$LWRITE:[1] "0" LOGOFF$DEAD:[1] "0" DBID:[9] "711595639" SESSIONCPU:[1] "0"
4 Mar 4 15:21:07 oraserver local1:info Oracle Audit[6545472]: LENGTH: "203" SESSIONID:[8] "75222035" ENTRYID:[1] "1" ACTION:[3] "101" RETURNCODE:[1] "0" LOGOFF$PREAD:[1] "0" LOGOFF$LREAD:[2] "39" LOGOFF$LWRITE:[1] "0" LOGOFF$DEAD:[1] "0" DBID:[9] "711595639" SESSIONCPU:[1] "0"
5 Mar 4 15:21:09 oraserver local1:info Oracle Audit[5456078]: LENGTH: "364" SESSIONID:[8] "75222039" ENTRYID:[1] "1" STATEMENT:[1] "1" USERID:[10] "APPLSYSPUB" USERHOST:[20] "oraserver.unix.com" TERMINAL:[7] "unknown" ACTION:[3] "100" RETURNCODE:[1] "0" COMMENT$TEXT:[99] "Authenticated by: DATABASE; Client address: (ADDRESS=(PROTOCOL=tcp)(HOST=69.9.172.201)(PORT=40174))" OS$USERID:[7] "apmgr09" DBID:[9] "711595639" PRIV$USED:[1] "5"
6 Mar 4 15:21:09 oraserver local1:info Oracle Audit[1609878]: LENGTH: "357" SESSIONID:[8] "75222040" ENTRYID:[1] "1" STATEMENT:[1] "1" USERID:[4] "APPS" USERHOST:[20] "oraserver.unix.com" TERMINAL:[7] "unknown" ACTION:[3] "100" RETURNCODE:[1] "0" COMMENT$TEXT:[99] "Authenticated by: DATABASE; Client address: (ADDRESS=(PROTOCOL=tcp)(HOST=69.9.172.201)(PORT=40175))" OS$USERID:[7] "apmgr09" DBID:[9] "711595639" PRIV$USED:[1] "5"
7 Mar 4 15:21:09 oraserver local1:info Oracle Audit[5456078]: LENGTH: "203" SESSIONID:[8] "75222039" ENTRYID:[1] "1" ACTION:[3] "101" RETURNCODE:[1] "0" LOGOFF$PREAD:[1] "0" LOGOFF$LREAD:[2] "39" LOGOFF$LWRITE:[1] "0" LOGOFF$DEAD:[1] "0" DBID:[9] "711595639" SESSIONCPU:[1] "0"
8 Mar 4 15:21:17 oraserver auth|security:info sshd[6545478]: Accepted publickey for sesas from 69.27.41.22 port 2504 ssh2
9 Mar 4 15:21:17 oraserver auth|security:info sshd[5456086]: subsystem request for sftp
10 Mar 4 15:21:46 oraserver daemon:info CCIRMTD[295062]: .CAICCI_W_2014[oraserver] Attempt to connect to host <remoteserver.unix.com> failed, Check t

Tuesday, 12 March 2013

Find Command Examples


 real world FIND usage


 find / -type f -name *.jpg  -exec cp {} . \;
find /dir -type f -size 0 -print
find . -type f -size +10000 -exec ls -al {} \;
find /var/nmon -mtime +30 | xargs -i rm {}
find /var/nmon -mtime +1 -exec gzip -9 {} \;

find . -atime +1 -type f -exec mv {} TMP \; # mv files older then 1 day to dir TMP
find . -name "-F" -exec rm {} \;   # a script error created a file called -F
find . -exec grep -i "vds admin" {} \;
find . \! -name "*.Z" -exec compress -f {} \;
find . -type f \! -name "*.Z" \! -name ".comment" -print | tee -a /tmp/list
find . -name *.ini
find . -exec chmod 775 {} \;
find . -user xuser1 -exec chown -R user2 {} \;
find . -user psoft  -exec rm -rf  {} \;
find . -name ebtcom*
find . -name mkbook
find . -exec grep PW0 {} \;
find . -exec grep -i "pw0" {} \;
find . -atime +6
find . -atime +6 -exec ll | more
find . -atime +6 -exec ll | more \;
find . -atime +6 -exec ll \;
find . -atime +6 -exec ls \;
find . -atime +30 -exec ls \;
find . -atime +30 -exec ls \; | wc -l
find . -name auth*
find . -exec grep -i plotme10 {};
find . -exec grep -i plotme10 {} \;
find . -ls -exec grep 'PLOT_FORMAT 22' {} \;
find . -print -exec grep 'PLOT_FORMAT 22' {} \;
find . -print -exec grep 'PLOT_FORMAT' {} \;
find ./machbook -exec chown 184 {} \;
find . \! -name '*.Z' -exec compress {} \;
find . \! -name "*.Z" -exec compress -f {} \;
find /raid/03c/ecn -xdev -type f -print
find /raid/03c/ecn -xdev -path -type f -print
find / -name .ssh* -print | tee -a ssh-stuff
find . -name "*font*"
find . -name hpmcad*
find . -name *fnt*
find . -name hp_mcad* -print
find . -grep Pld {} \;
find . -exec grep Pld {} \;
find . -exec grep PENWIDTH {} \; | more
find . -name config.pro
find /raid -type d ".local_sd_customize" -print
find /raid -type d -name ".local_sd_customize" -print
find /raid -type d -name ".local_sd_customize" -ok cp /raid/04d/MCAD-apps/I_Custom/SD_custom/site_sd_customize/user_filer_project_dirs {} \;
find /raid -type d -name ".local_sd_customize" -exec cp /raid/04d/MCAD-apps/I_Custom/SD_custom/site_sd_customize/user_filer_project_dirs {} \;
find . -name xeroxrelease
find . -exec grep xeroxrelease {} \;
find . -name xeroxrelease
find . -name xeroxrelease* -print 2>/dev/null
find . -name "*release*" 2>/dev/null
find / -name "*xerox*" 2>/dev/null
find . -exec grep -i xeroxrelease {} \;
find . -print -exec grep -i xeroxrelease {} \;
find . -print -exec grep -i xeroxrelease {} \; > xeroxrel.lis
find . -exec grep -i xeroxrel {} \;
find . -print -exec grep -i xeroxrel {} \;
find . -print -exec grep -i xeroxrel {} \; | more
find /raid/03c/inwork -xdev -type f -print >> /raid/04d/user_scripts/prt_list.tmp
find . -exec grep '31.53' {} \;
find . -ls -exec grep "31/.53" {} \; > this.lis
find . -print -exec grep "31/.53" {} \; > this.lis
find . -print -exec grep 31.53 {} \; > this.lis
find . -exec grep -i pen {} /;
find . -exec grep -i pen {} \;
find . -print -exec grep -i pen {} \; | more
find . -exec grep -i pen {} \;
find . -atime +6 -exec ll | more \;
find . -atime +6 -exec ll \;
find . -atime +6 -exec ls \;
find . -atime +30 -exec ls \;
find . -atime +30 -exec ls \; | wc -l
find . \! -name '*.Z' -exec compress -f {} \;
find . -name 'cache*' -depth -exec rm {} \;
find . -name 'cache*' -depth -print | tee -a /tmp/cachefiles
find . -name 'cache[0-9][0-9]*' -depth -print | tee -a /tmp/cachefiles
find . -name 'hp_catfile' 'hp_catlock' -depth -print | tee -a /tmp/hp.cats
find . -name 'hp_catfile' -name 'hp_catlock' -depth -print | tee -a /tmp/hp.cats
find . -name 'hp_cat*' -depth -print | tee -a /tmp/hp.cats
find . -name 'hp_cat[fl]*' -depth -print | tee -a /tmp/hp.cats
find /raid -name 'hp_cat[fl]*' -depth -print
find . \! -name '*.Z' -exec compress -f {} \;
find . -name '*' -exec compress -f {} \;
find . -xdev -name "wshp1*" -print
find . -xdev -name "wagoneer*" -print
find . -name "xcmd" -depth -print
find /usr/contrib/src -name "xcmd" -depth -print
find /raid -type d -name ".local_sd_customize" -exec ls {} \;
find /raid -type d -name ".local_sd_customize" \
   -exec cp /raid/04d/MCAD-apps/I_Custom/SD_custom/site_sd_customize/user_filer_project_dirs {} \;

find . -name "rc.conf" -print

find . -name "rc.conf " -exec chmod o+r '{}' \; -print

find . -not (\ -name "*.v" -o -name "*,v" \) '{}' \; -print


Crontab – Quick Reference


Setting up cron jobs in Unix , AIX,Solaris,Linux & HP-Ux


cron is a unix, solaris utility that allows tasks to be automatically run in the background at regular intervals by the cron daemon. These tasks are often termed as cron jobs in unix , solaris.  Crontab (CRON TABle) is a file which contains the schedule of cron entries to be run and at specified times.
This document covers following aspects of Unix cron jobs
1. Crontab Restrictions
2. Crontab Commands
3. Crontab file – syntax
4. Crontab Example
5. Crontab Environment
6. Disable Email
7. Generate log file for crontab activity
1. Crontab Restrictions
You can execute crontab if your name appears in the file /usr/lib/cron/cron.allow. If that file does not exist, you can use
crontab if your name does not appear in the file /usr/lib/cron/cron.deny.
If only cron.deny exists and is empty, all users can use crontab. If neither file exists, only the root user can use crontab. The allow/deny files consist of one user name per line.
2. Crontab Commands
export EDITOR=vi ;to specify a editor to open crontab file.
crontab -e    Edit your crontab file, or create one if it doesn’t already exist.
crontab -l      Display your crontab file.
crontab -r      Remove your crontab file.
crontab -v      Display the last time you edited your crontab file. (This option is only available on a few systems.)
3. Crontab file
Crontab syntax :
A crontab file has five fields for specifying day , date and time followed by the command to be run at that interval.
*     *     *   *    *        command to be executed
-     -     -   -    -
|     |     |   |    |
|     |     |   |    +----- day of week (0 - 6) (Sunday=0)
|     |     |   +------- month (1 - 12)
|     |     +--------- day of        month (1 - 31)
|     +----------- hour (0 - 23)
+------------- min (0 - 59)
* in the value field above means all legal values as in braces for that column.
The value column can have a * or a list of elements separated by commas. An element is either a number in the ranges shown above or two numbers in the range separated by a hyphen (meaning an inclusive range).
Notes
A. ) Repeat pattern like /2 for every 2 minutes or /10 for every 10 minutes is not supported by all operating systems. If you try to use it and crontab complains it is probably not supported.
B.) The specification of days can be made in two fields: month day and weekday. If both are specified in an entry, they are cumulative meaning both of the entries will get executed .
4. Crontab Example
A line in crontab file like below removes the tmp files from /home/someuser/tmp each day at 6:30 PM.
30     18     *     *     *         rm /home/someuser/tmp/*
Changing the parameter values as below will cause this command to run at different time schedule below :
min
hour
day/month
month
day/week
Execution time
30
0
1
1,6,12
*
– 00:30 Hrs  on 1st of Jan, June & Dec.

0
20
*
10
1-5
–8.00 PM every weekday (Mon-Fri) only in Oct.

0
0
1,10,15
*
*
– midnight on 1st ,10th & 15th of month

5,10
0
10
*
1
– At 12.05,12.10 every Monday & on 10th of every month
:
Note : If you inadvertently enter the crontab command with no argument(s), do not attempt to get out with Control-d. This removes all entries in your crontab file. Instead, exit with Control-c.
5. Crontab Environment
cron invokes the command from the user’s HOME directory with the shell, (/usr/bin/sh).
cron supplies a default environment for every shell, defining:
HOME=user’s-home-directory
LOGNAME=user’s-login-id
PATH=/usr/bin:/usr/sbin:.
SHELL=/usr/bin/sh
Users who desire to have their .profile executed must explicitly do so in the crontab entry or in a script called by the entry.
6. Disable Email
By default cron jobs sends a email to the user account executing the cronjob. If this is not needed put the following command At the end of the cron job line .
>/dev/null 2>&1
7. Generate log file
To collect the cron execution execution log in a file :
30 18 * * * rm /home/someuser/tmp/* > /home/someuser/cronlogs/clean_tmp_dir.log